TWS
PREPAR ROOM/NETWORK
THINGS TO CONSIDER BEFORE SETTING UP YOUR ROOM
To ensure that you have the best possible conferencing experience we advise you to consider the physical conditions of the room where you place your TWS.
The lighting in your environment is the most important component for optimal image quality. The built in camera on your TWS is designed to work well using normal office lightning; however, indirect light from shaded sources or reflected light from pale walls often produces good results.
Be sure to position your TWS near your display, so you give other participants in your meeting the illusion you are looking at them when you are looking at the camera and tv display.
NETWORK
Easymeeting recommends use of one static public IP for each of your video conferencing terminals.
If you are familiar with how data networking works, then have a look at our TWS Firewall/Network guideline here for more information about the different setup options.
If you’re new to data networking and internet working, please ask your network administrator/provider to assign you a static public IP and configure your network/firewall for use with the Easymeeting TWS video conferencing terminal. We have provided a sample email to your network administrator below.
While waiting for the required network information, contact Easymeeting to subscribe for Easymeeting Cloud Connect for your TWS, and you will get your EasyNumber and registration information (serial number can be added later, or by Easymeeting.net).
Note: This guide is based on our best practice recommendations on how to configure network and firewall.
Please feel free to copy the sample text below and paste it in an email request to your network administrator/provider:
Hello Network Admin,
We have purchased a TWS video conferencing terminal for use in meeting room XXX.
Can you please assign me a static IP and configure the network and firewall according to the network guideline from Easymeeting at https://helpdesk.easymeeting.net/hc/en-us/articles/207736709-FIREWALL-RECOMMENDATIONS-GUIDELINES?
The following network information is required to successfully utilize all of Easymeeting’s benefits:
IP-address:
Gateway address:
Subnet mask:
Easymeeting TWS video conferencing terminal uses the following ports for communication through the firewall:
TCP 1720 (Call Setup)
UDP 1719 (Easymeeting registration and EasyNumber)
TCP 3230 – 3280 (Audio/video/data)
UDP 3230 – 3280 (Audio/video/data)
REGISTER YOUR TWS
Please contact Easymeeting for a subscription on Easymeeting Cloud Connect for your new Easymeeting TWS. We will assign you an EasyNumber and send you the registration information within 1 business day.
The contact information will later be used to notify you of new software upgrades and other news concerning your Easymeeting TWS.
BENEFITS
- Join into your EasyConference rooms by simply dialing the six digit EasyNumber, no IP necessary
- Increase interoperability with other conferencing solutions without additional hardware purchases
- Enable your system for SIP and URI dialing without spam issues and extra infrastructure costs. (i.e. joe@easym.net)
- Enable your system to receive calls from Lync clients
- Allow user-friendly dialing identifications like the 6 digit EasyNumbers or your company name
- Keep your EasyNumber, even when you move locations or change networks
- Monitor your system usage and get statistics with the additional Customer Portal
- Vendor agnostic (works on H.323 and SIP)
CONNECTING DEVICES
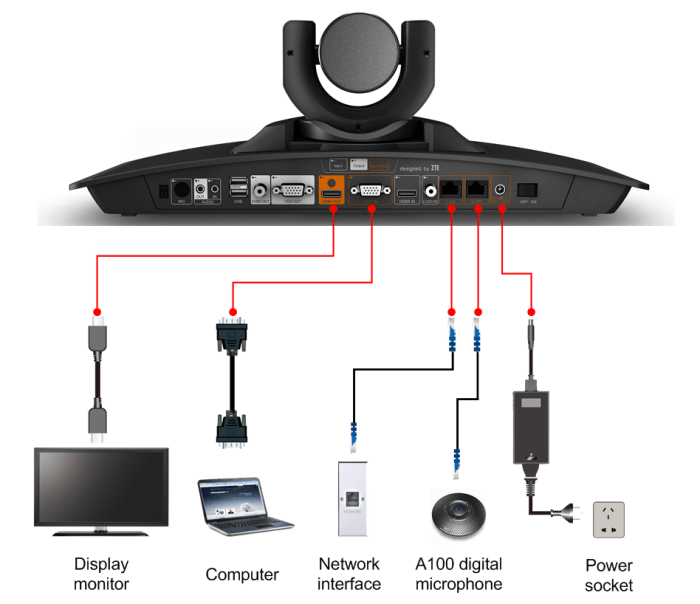
1. Power Connection
2. D-MIC for A100 digital microphone
3. LAN for network connection
4. HDMI Out for default display
5. Microphone Input
6. Audio In and Out (3.5mm)
7. USB for future use, maintenance
8. VGA Out for secondary display
9. VGA In for computer/presentation
10. HDMI In for computer/presentation
Connecting with Dual Display Capability
NOTE! HDMI is the default display output and VGA is the secondary display output (*).
Audio and video are normally sent to the monitor together when using an HDMI connection to your
REMOTE CONTROL

FIRST TIME SET UP
Our Guided Setup will be displayed the first time you power on your Easymeeting TWS.
1. Language: The Easymeeting TWS currently only supports the English language and this is not possible to change.
2. System Name: Please enter a name for your location. Press KEYB on your remote controller to toggle between letters and numbers.
3. EasyName(H323): Please enter the EasyName provided by the Easymeeting Service Center or leave it with the default name if you don’t have this information available (NOTE: EasyName is case sensitive).
4. EasyNumber: Please enter the EasyNumber provided by the Easymeeting Service Center or leave it with the default number if you don’t have this information available.
5. Time Zone, Date and Time: Choose your current time zone. Currently does not adjust for daylight savings, but can be manually adjusted from the Preferences, Date & Time menu. You must disable SNTP.
6. Guide remind next time: Check/Uncheck if you want the guided set up to appear each time the system is turned on.7. Static IP or DHCP? Static IP is normal for video conferencing equipment. Ask your network administrator if you are not sure.
8. Enter the IP address provided by your network administrator
9. Enter the Subnet Mask provided by your network administrator.
10. Enter the Gateway provided by your network administrator.
11. Use of Static NAT: is normal if your system is set up with a private IP address or DHCP. Enable this option and enter your public NAT IP provided by your network administrator if your static IP or DHCP address is within one of the private IP rages described below:
- From 10.0.0.0 to 10.255.255.255
- From 172.16.0.0 to 172.31.0.0
- From 192.168.0.0 to 192.168.255.255
12. Enable H.460 if you subscribe to a firewall traversal service from Easymeeting.net or want to connect your TWS to your own H.460 traversal server.
13. Caretaker IP: Leave as its default value or change it to the IP provided from Easymeeting Service Center.
PLACING A CALL
Navigate to the TWS main menu to place your call. Enter the number or address you want to dial, and press the green call button on your remote to place the call.
NOTE: You can get to this screen by pressing the green call button on your remote at any time.
ANSWER AN INCOMING CALL
If auto-answer is enabled: when someone dials your TWS, the system will answer and your microphone will be automatically be muted. Un-mute your microphone and enjoy your Easymeeting!
If auto-answer is not enabled: You will receive a pop up on your screen advising of the incoming call. Use the arrow key and press «OK» to accept or reject the call.
ENDING A CALL
Press the red “Disconnect Button” on your remote twice or press the “OK” button on your remote to confirm disconnection. If you would like to go back to the conference press the right arrow to select “Cancel” and then “OK”.
«auto-answer» Off
To disable auto-answer on the TWS:
From the webinterface >
Go to System Settings>
General>
Call Option>
P2P Answer>
Set it to Auto

When auto-answer is not enabled: You will receive a pop up on your screen advising of the incoming call. Use the arrow key and press «OK» to accept or reject the call.
Auto-answer will allow an incoming call to automatically pick up.
«auto-answer» On
To enable auto-answer on the TWS:
From the webinterface >
Go to System Settings>
General>
Call Option>
P2P Answer>
Set it to Auto
If auto-answer is enabled: when someone dials your TWS, the system will answer and your microphone will be automatically be muted. Un-mute your microphone and enjoy your Easymeeting!

When auto-answer has been disabled, you will have to accept the call from the remote.
IN CALL FEATURES
MUTE OR UNMUTE THE MICROPHONE
Press the Mute key on the remote control ( ) to turn off the local microphone. Press the Mute key again to turn on the microphone.
or
Press the big center button the microphone to turn off the local microphone, and press the same button again to turn on the microphone.
Blue led on the microphone indicates that it’s on and are sending audio.
No light on the microphone is a indication of no audio sent to the other end.
ADJUST VOLUME
Press the volume button on the remote control to adjust the output volume.
Press + to turn the output volume up, and – to turn the output volume down.
ADJUST CAMERA
The position of the local camera can be adjusted by the remote control when the terminal is idle or in conference. In order to adjust the camera when the terminal is idle, press return on the remote until only the camera view is showing, no on screen menu.
On the remote control, press the up, down, left and right direction keys to adjust the camera angle.Press the “zoom in/out” key on the remote control to zoom in or zoom out.
To adjust a far end camera when in a call, press the Near/Far key until the Far End Camera icon appears on the TV screen. Adjust the camera as necessary.
SHARE DATA
Easymeeting TWS include support for sharing data from the presentation input (typically a personal computer connected to the terminal) while simultaneously showing video from the primary input. This enables you to view a live presenter and the content at the same time.
Connect your laptop and press the content button to start the presentation. A message appears asking you if you want to send or preview the presentation. Press the content button one more time to send presentation or stop the preview.
To stop presentation, press the content button followed by the OK button on the remote.
The far end can also start a presentation, which halts the current presentation at the near end. The following indicators appear in the user interface when you send or receive a presentation:
Press the Stop presentation button again to stop the presentation.
SWITCH LAYOUT
When the terminal is not in conference, the available display modes are GUI menu mode and local video mode.
When the terminal is in conference, the available display modes are determined by the configuration of Video Output. Press the Layout key on the remote control repeatedly to switch between different layout modes.